Windows Azure Service Bus でオンプレミスと連携する Oct-2012版
Windows Azure のサービスの一つである Service Bus でオンプレミスと連携をするサンプルを作成しようとしてますが Azure の更新速度が早いため、サンプルの用語と環境が最新とは異なり自分がやる時に苦労したのでまとめました。
今回は 10行でズバリ!! [C#] Windows Azure サービス バスでオンプレミス/クラウド間の通信を行う in C#, HTML, XML の Service Bus のサンプルを以下の環境で実施します。
環境
- Visual Studio 2012
- Windows Azure SDK for .NET(VS2012)1.8-October 2012(以下SDK1.8)
- Windows 8
サービス バスを使用する準備: 名前空間の作成
管理ポータルにログインして「サービスバス」→下に表示される「新規」をクリックします。

作成するサービスバスのIDを入力し登録します。今回は「hogehogehoge」にします。

開発環境の構成
参考にする記事では RelayConfiguraionInstaller.exe を実行していますがSDK1.8には入っていません。
(参考:Release Notes for the Service Bus October 2012 Release)
Nugetから Service Bus のプロジェクト(NuGet Gallery | Windows Azure Service Bus 1.8.0.0)をインストールしてくれ、とのこと(意訳)なのでプロジェクトを作成後、インストールします。
アプリケーションのプロジェクトの作成 (オンプレミス/サービス側)
Windows Azure アプリケーションのプロジェクトの作成 (クラウド/クライアント側)
両方一緒にやります。
「ファイル」→「新しいプロジェクト」→「Visual C#」→「Cloud」→「Windows Azure クラウドサービス」を選択。プロジェクト名を「AzureServiceBusSample」にします。

「OK」をクリックすると何を作成するか選択するダイアログが出るので「Web Role」を選択し名前を「ServiceBusClient」にします。
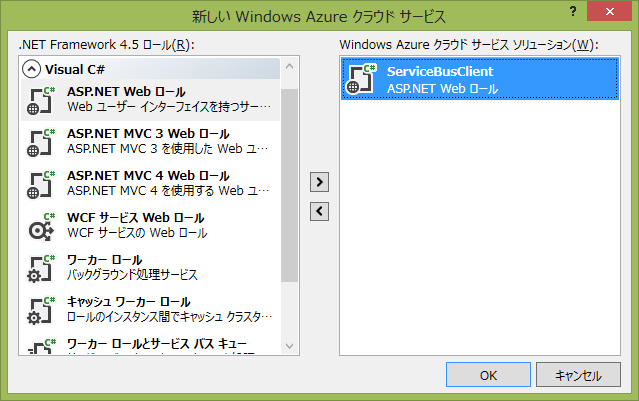
Azure に作成するので混乱しますが、クラウド⇔オンプレミス連携の「クラウド側」に当たるものです。
次にオンプレミス側のサービスを作成します。
「ファイル」→「新しいプロジェクト」→「Visual C#」→「コンソールアプリケーション」
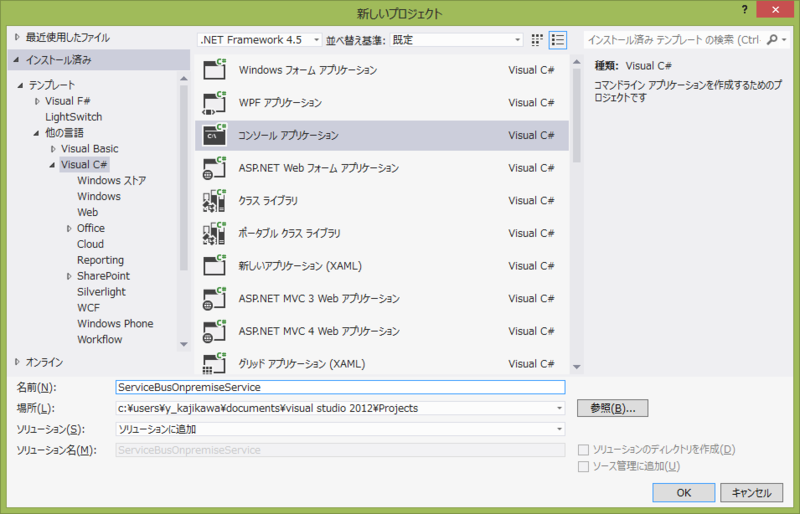
「ServiceBusOnpremiseService」にします。
WindowsAzure.ServiceBus のインストール
パッケージコンソールを起動し、作成した2つのプロジェクトに対し以下のコマンドを実行します。
PM> Install-Package WindowsAzure.ServiceBus
これにより、ServiceBus用のDLLへの参照、および、Web.config、App.configへの必要な設定が追記されます。
サービス バスを使用するサービス コードの実装 (オンプレミス/サービス側)
ServiceBusOnpremiseServiceプロジェクトに以下の内容の SampleService.cs を追加します。
using System;
using System.ServiceModel;

namespace ServiceBusOnpremiseService
{
    // WCF サービス コントラクトの定義
    [ServiceContract(Namespace = "http://schemas.example.com/sample")]
    public interface ISampleService
    {
        [OperationContract]
        string Echo(string message);
    }

    // WCF サービスの実装
    class SampleService : ISampleService
    {
        public string Echo(string message)
        {
            // コンソールに出力
            Console.WriteLine("Echo: '{0}'", message);
            return message;
        }
    }
}
サービス バスを使用するための構成情報の追加 (オンプレミス/サービス側)
App.config を編集します。以下の内容を
<?xml version="1.0" encoding="utf-8"?>
<configuration>
  <startup>
    <supportedRuntime version="v4.0" sku=".NETFramework,Version=v4.5" />
  </startup>
  <system.serviceModel>
    <!-- 追記ここから -->
    <!-- サービスの構成 -->
    <services>
      <service name="ServiceBusOnpremiseService.SampleService">
        <endpoint contract="ServiceBusOnpremiseService.ISampleService" binding="netTcpRelayBinding"
                  bindingConfiguration="NetTcpRelayEndpointConfig"
                  behaviorConfiguration="SBEndpointBehavior" />
      </service>
    </services>

    <!-- Windows Azure サービスバス用のバインディングの構成 -->
    <bindings>
      <netTcpRelayBinding>
        <binding name="NetTcpRelayEndpointConfig">
          <security relayClientAuthenticationType="RelayAccessToken" />
        </binding>
      </netTcpRelayBinding>
    </bindings>

    <!-- Windows Azure サービスバス用のエンドポイント ビヘイビアの構成 -->
    <behaviors>
      <endpointBehaviors>
        <behavior name="SBEndpointBehavior">
          <transportClientEndpointBehavior credentialType="SharedSecret">
            <clientCredentials>
              <sharedSecret issuerName="owner"
                            issuerSecret="rhX4nDF7wOSwOWrUbIHh22cXHC+bMZyaMdc2KBcDy3E="/>
            </clientCredentials>
          </transportClientEndpointBehavior>
        </behavior>
      </endpointBehaviors>
    </behaviors>
    <!-- 追記ここまで -->
    <extensions>
~省略~
issuerName、issuerSecretは、作成したService Busのものを設定しましょう。
確認方法は、管理ポータル→「サービスバス」で対象のサービスバスを選択し「アクセスキー」をクリック。
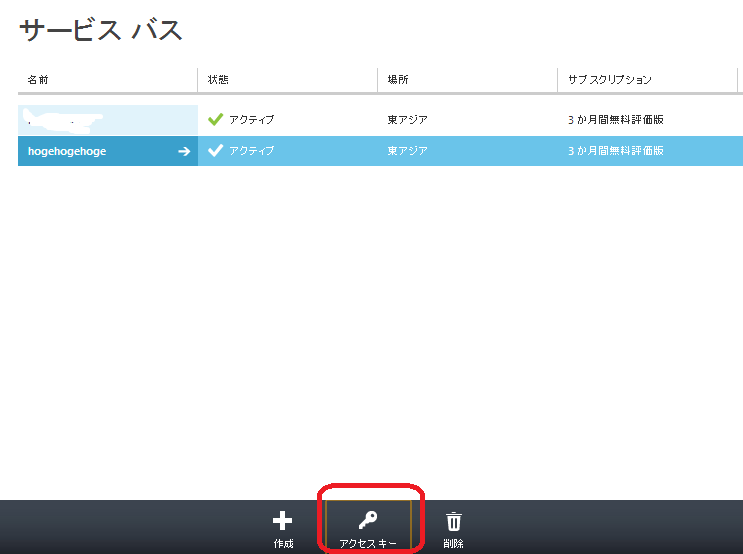
表示されるアクセスキーをコピーし、設定します。
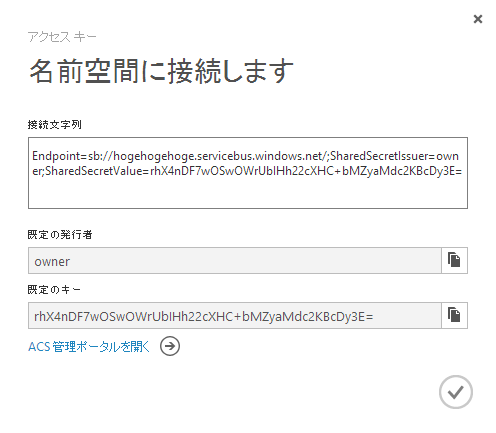
なお、この App.config を設定すると以下の警告が表示されます。
behaviorExtensions,bindingElementExtensions に追加してあるのですが認識できていないためのようです。
警告が出ても動くのでこのまま進みます。
(誰が正しい設定方法があれば教えていただきたいです)
- transportClientEndpointBehavior
要素 'behavior' には無効な子要素 'transportClientEndpointBehavior' が含まれています。必要とされる要素は 'clientVia, callbackDebug, callbackTimeouts, clear, clientCredentials, transactedBatching, dataContractSerializer, dispatcherSynchronization, remove, synchronousReceive, webHttp, enableWebScript, endpointDiscovery, soapProcessing' です。
- netTcpRelayBinding
要素 'bindings' には無効な子要素 'netTcpRelayBinding' が含まれています。必要とされる要素は 'basicHttpBinding, basicHttpsBinding, customBinding, msmqIntegrationBinding, netHttpBinding, netHttpsBinding, netPeerTcpBinding, netMsmqBinding, netNamedPipeBinding, netTcpBinding, wsFederationHttpBinding, ws2007FederationHtCtpBinding, wsHttpBinding, ws2007HttpBinding, wsDualHttpBinding, netTcpContextBinding, wsHttpontextBinding, basicHttpContextBinding, mexHttpBinding, mexHttpsBinding, mexNamedPipeBinding, mexTcpBinding, webHttpBinding, udpBinding' です。
サービス ホスト コードの実装 (オンプレミス/サービス側)
ServiceBusOnpremiseServiceプロジェクトの Program.cs を編集します。
エンドポイントのURLは、自分が作成したServiceBusのものを設定しましょう。
using System;
using System.ServiceModel;
using Microsoft.ServiceBus;

namespace ServiceBusOnpremiseService
{
    class Program
    {
        static void Main(string[] args)
        {
            // サービスバスの接続モードの設定
            ServiceBusEnvironment.SystemConnectivity.Mode = ConnectivityMode.AutoDetect;
            // サービスバスに公開するエンドポイント URL を生成
            Uri address = ServiceBusEnvironment.CreateServiceUri("sb", "hogehogehoge", "Sample");

            // WCF サービスホストを生成
            ServiceHost host = new ServiceHost(typeof(SampleService), address);
            // WCF サービスホストを開始
            host.Open();

            Console.WriteLine("Press ENTER to exit...");
            Console.ReadLine();

            // WCF サービスホストを終了
            host.Close();
        }
    }
}
サービス バスを使用するクライアント コードの実装 (クラウド/クライアント側)
ServiceBusClientプロジェクトに SampleServiceClient.cs を以下の内容で作成します。
using System.ServiceModel;

namespace ServiceBusClient
{
    // WCF サービス コントラクトの定義
    [ServiceContract(Namespace = "http://schemas.example.com/sample")]
    public interface ISampleService
    {
        [OperationContract]
        string Echo(string message);
    }

    // クライアント チャンネルの定義
    interface ISampleChannel : IClientChannel, ISampleService { }
}
また、Webフォーム「WebForm.aspx」を以下の内容で作成します。
- WebForm.aspx
<%@ Page Language="C#" AutoEventWireup="true" CodeBehind="WebForm.aspx.cs" Inherits="ServiceBusClient.WebForm" %>
<html xmlns="http://www.w3.org/1999/xhtml">
<head id="Head1" runat="server">
    <title></title>
</head>
<body>
    <form id="form1" runat="server">
    <div>
        <h2>Windows Azure ServiceBus Sample</h2>
        Message: <asp:TextBox ID="MessageTextBox" runat="server" />
        <asp:Button ID="PostButton" runat="server" Text="POST"
            onclick="PostButton_Click" /><br />
        <hr />
        Echo: <asp:Label ID="EchoLabel" runat="server" />
    </div>
    </form>
</body>
</html>
- WebForm.aspx.cs
using System;
using System.ServiceModel;
using Microsoft.ServiceBus;

namespace ServiceBusClient
{
    public partial class WebForm : System.Web.UI.Page
    {
        protected void Page_Load(object sender, EventArgs e)
        {

        }

        protected void PostButton_Click(object sender, EventArgs e)
        {
            // サービスバスに登録されているサービスのエンドポイント URL を作成
            Uri address = ServiceBusEnvironment.CreateServiceUri("sb", "hogehogehoge", "Sample");

            // WCF クライアント チャンネル ファクトリーを生成
            ChannelFactory<ISampleChannel> channelFactory =
                new ChannelFactory<ISampleChannel>("SampleService", new EndpointAddress(address));
            // サービス呼び出し用の WCF クライアント チャネルを生成
            ISampleChannel client = channelFactory.CreateChannel();

            // サービスバス接続されているサービスを呼び出す
            EchoLabel.Text = client.Echo(MessageTextBox.Text);

            // チャンネルならびにチャンネル ファクトリーを破棄
            client.Close();
            channelFactory.Close();
        }
    }
}
サービス バスを使用するための構成情報の追加 (クラウド/クライアント側)
Web.config の
  <system.serviceModel>
    <!-- 追記ここから -->
    <!-- Windows Azure サービスバス用のバインディングの構成 -->
    <bindings>
      <netTcpRelayBinding>
        <binding name="NetTcpRelayEndpointConfig">
          <security relayClientAuthenticationType="RelayAccessToken" />
        </binding>
      </netTcpRelayBinding>
    </bindings>

    <!-- Windows Azure サービスバス用のエンドポイント ビヘイビアの構成 -->
    <behaviors>
      <endpointBehaviors>
        <behavior name="SBEndpointBehavior">
          <transportClientEndpointBehavior credentialType="SharedSecret">
            <clientCredentials>
              <sharedSecret issuerName="owner"
                            issuerSecret="rhX4nDF7wOSwOWrUbIHh22cXHC+bMZyaMdc2KBcDy3E="/>
            </clientCredentials>
          </transportClientEndpointBehavior>
        </behavior>
      </endpointBehaviors>
    </behaviors>

    <!-- クライアントの構成 -->
    <client>
      <endpoint name="SampleService"
                contract="ServiceBusClient.ISampleService"
                binding="netTcpRelayBinding"
                bindingConfiguration="NetTcpRelayEndpointConfig"
                behaviorConfiguration="SBEndpointBehavior" />
    </client>
  <!-- 追記ここまで -->
    <extensions>
ローカル環境での動作確認
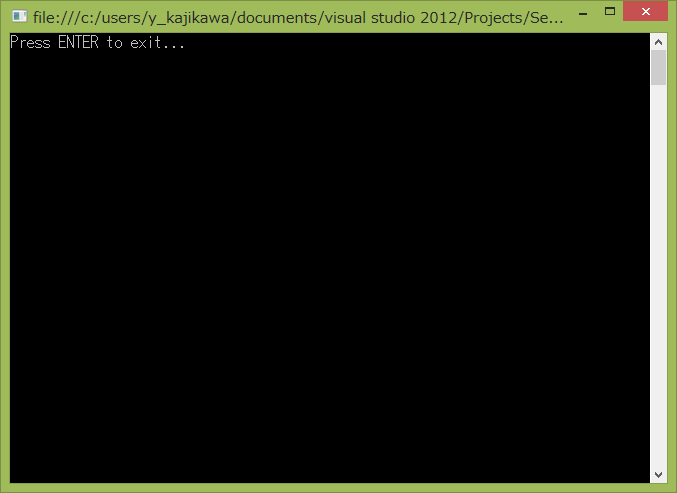
ServiceBusOnpremiseService をデバッグ実行します。
設定が正しくサービスバスに接続していれば以下の画面が表示されます。
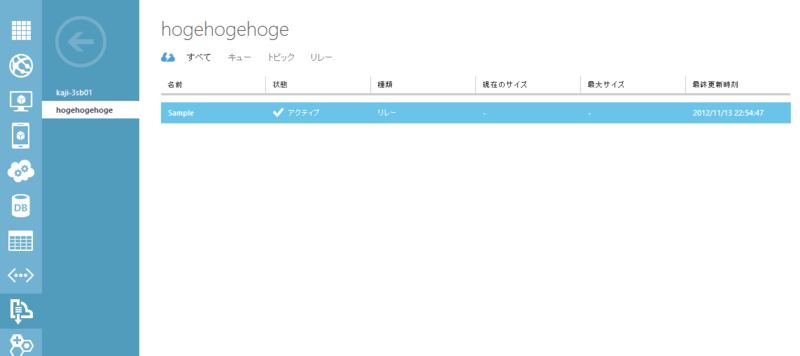
管理ポータル→「サービスバス」→「作成したサービスバス」をクリックすると以下のように接続がされリレーが存在する事を確認できます。
次に、ServiceBusClient をデバッグ実行します。
WebForm.aspx を参照するURLを開きます。
そして、テキストボックスに「メッセージ」と入力し「POST」ボタンを押します。
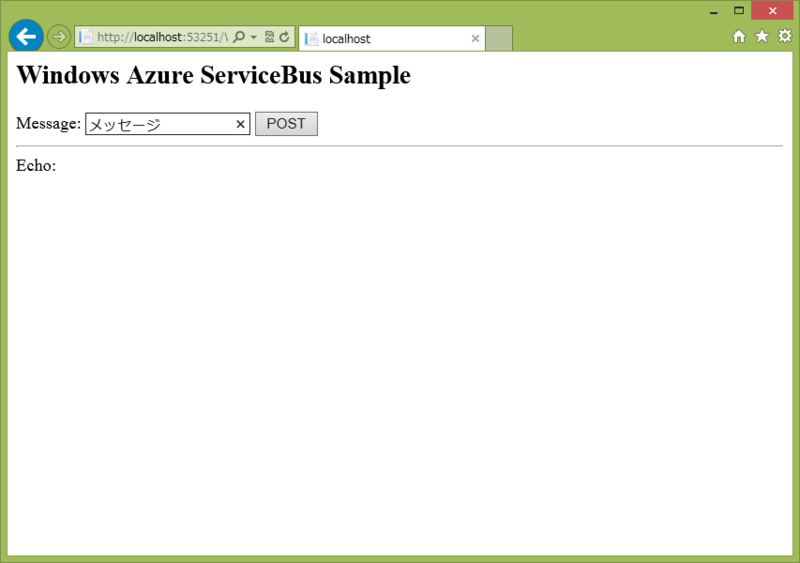
するとサービス側には「メッセージ」が表示されクライアント側にはメッセージが返信されます。

Windows Azure 上への配置と動作確認
ServiceBusClient を Azure Web ロールにデプロイすれば動作します。
Azure Web ロールは元記事でも省略されているのでがんばってください。
最後に
以外に簡単に Service Bus が利用できることがわかりました。
あと、Toolのバージョンアップで手順が大分簡略化できる事もわかりましたが。。
日本語のドキュメントが少ないので今後も最新化+英語記事を実践したらブログに書こうとおもいます。